Three-dimensional measurements with a novel technique combination of confocal and focus variation with a simultaneous scan
Aitor has been working at Sensofar since 2007 in charge of the development of algorithms and data treatment of three dimensional optical measurement systems using Confocal, Interferometry and Focus Variation techniques.
Currently, he is responsible for the development of the data acquisition software, the essential SensoSCAN Software.
Three-dimensional measurements with a novel technique combination of confocal and focus variation with a simultaneous scan publication
A. Matilla 1, J.Mariné 1, J. Pérez 1, C.Cadevall 1,2, R.Artigas 1,2
1 Sensofar Tech SL, (Spain)
2 Center for Sensors, Instruments and Systems Development (CD6), Universitat Politècnica de Catalunya (UPC) Rambla Sant Nebridi, 10, E-08222 Terrassa, Spain
Proceedings Volume 9890, Optical Micro- and Nanometrology VI; 98900B (2016) https://doi.org/10.1117/12.2227054
Event: SPIE Photonics Europe, 2016, Brussels, Belgium
Abstract
The most common optical measurement technologies used today for the three dimensional measurement of technical surfaces are Coherence Scanning Interferometry (CSI), Imaging Confocal Microscopy (IC), and Focus Variation (FV). Each one has its benefits and its drawbacks. FV will be the ideal technology for the measurement of those regions where the slopes are high and where the surface is very rough, while CSI and IC will provide better results for smoother and flatter surface regions.
In this work we investigated the benefits and drawbacks of combining Interferometry, Confocal and focus variation to get better measurement of technical surfaces. We investigated a way of using Microdisplay Scanning type of Confocal Microscope to acquire on a simultaneous scan confocal and focus Variation information to reconstruct a three dimensional measurement. Several methods are presented to fuse the optical sectioning properties of both techniques as well as the topographical information.
This work shows the benefit of this combination technique on several industrial samples where neither confocal nor focus variation is able to provide optimal results.
1. Introduction
Modern microscopes and profilometers, such as the Coherence scanning interferometer (CSI) which is often also called the scanning white light interferometer (SWLI), approach sub-nm precision in height measurements. As they offer a larger field of view (FOV) than e.g. the atomic force microscope (AFM), which has previously been used to calibrate low steps, interferometric profilers open new measurement opportunities [1, 2]. With a large FOV, however, come limitations. The diffraction-limited horizontal resolution makes small features difficult to see clearly, and also the vertical precision for horizontally small features is degraded as their edges become blurred [3, 4].
For the CSI, accurate calibration of the vertical scale can be difficult, as this scale typically depends on the accuracy of the height encoder and the properties of translation. Depending on the kind of encoder and translator, there can be different types of non-linearities and other error sources e.g. Abbe error. The interferometric Z-scale [4, 5, 6] such as is used in a metrological AFM (MAFM) [7] is one solution, but it is costly, adds complexity and also patent issues can prevent its use. Thus, physical transfer standards (TS) are usually favoured as a method to bring traceability into CSI measurements [8, 9], but also e.g. adjustable height standards have been tested [10, 11]. In addition to translator errors, it is necessary to test the surface localization algorithm of the CSI, as this algorithm can produce errors that are independent of the scanner but dependent e.g. on the used light spectrum and surface properties. For larger step heights there are a variety of step height standards and gauge blocks to calibrate to this scale.
However, for <10 nm steps it is difficult to find good TS. Thus, non-linearity in the Z-scale at nm scale could go unnoticed. This issue becomes important when the CSI is used to measure features that are only a few nm high. Noncontacting areal measurements such as those done with the CSI and typical error sources of such measurements are covered by the ISO 25178 standard especially parts 600 and – 604 [12].
In the past few decades, three-dimensional measurement of technical surfaces with optical methods has gained a large portion of the market. Many technologies have been developed, the most prevalent being single points sensors that scan the surface, and imaging sensors that employ a video camera to obtain the height information of all the pixels simultaneously. The most common imaging methods for microscopic measurements are Coherence Scanning Interferometry (CSI), Imaging Confocal Microscopy (ICM), and Focus Variation (FV) [1].
CSI is the most precise all of them, since its ability to resolve small height deviations, translating into height resolution, merely depends on the coherence length of the light source and the linearity of the Z stage. CSI is capable of achieving height resolution down to 1 nm regardless of the magnification of the objective that is being used. Nevertheless, the requirement for an interferometer setup between the optics of the microscope’s objective and the surface under inspection, restricts the overall optical system to relatively low numerical apertures (NA), this then being the cause of the technique’s main drawback when measuring optically smooth surfaces with relatively high local slopes. Confocal microscopy overcomes this problem, however, as it uses high numerical aperture objectives, and thus is capable of retrieving signals from much higher slopes than CSI. At the highest NA in air (typically 0.95), a height resolution of 1 nm is achieved, and local slopes up to the optical limit of 72 degree are measureable. The main drawback of confocal microscopy is that height resolution is dependent on the NA, so that low magnification optics (that have low numerical aperture) yields less height resolution. The technique is therefore unusable on smooth surfaces that have to be measured with low magnification. On optically rough surfaces, confocal microscopy achieves significantly better results in comparison to CSI, but at very high roughness, or even on rough and highly tilted surfaces, it suffers from poor signal. In this particular case, focus variation provides the best results, as it is based on the texture present in the bright field image.
Height resolution is difficult to specify, as it depends on the texture contrast, on the algorithm to extract the focus position [2], the numerical aperture and the wavelength. Optically smooth surfaces cannot be measured with FV, since no texture is present on the surface, and no focus position can be retrieved. Those surfaces that at a given wavelength and NA appear optically smooth (and are thus not suitable for focus variation), may appear as optically rough when decreasing the wavelength, or the magnification. This is the reason why focus variation is most typically suitable with low magnification, since most of the surface then appears as optically rough.
2. Surface metrology data fusion
There is a growing demand of data fusion from the macro-scale to the micro/nano scale. This is the case where large parts are manufactured within tight tolerances or even with small features. Diamond turned optical surfaces with diffractive patterns are a typical case where the lens is several mm in diameter while having topographical features in the order of few micron wide and less than 1 micron height. Full measurement requires gigapixel information, which can only be carried today by stitching of small sampled fields. Another typical case is large metallic parts with micromachined surfaces, which cannot be sampled with a conventional CMM because of the convolution with the prove, and requires the use of an optical-CMM to closely sample narrow fields while preserving the high accuracy of the measured field within a larger volume.
Data fusion has been carried since the 60’s in different fields, and can be primarily classified in three levels: decision, feature, and signal level [3]. Decision data fusion level is when a set of parameters describing the surface characteristics are extracted from the topographical data, like roughness or step height, from measurements taken from different sensors and at the same or different scales. The data collected from all those sensors is providing information to take a decision, like sorting the parts in different qualities or binning parts within different manufacturing plants. Feature extraction data fusion is of lower level, where geometrical structures are extracted from sets of topographical measures with different scales. Signal level data fusion relies on the topographical correlation of data from the same or different sensors, providing as a result a point cloud data. When dealing with separated sensors at different scales, topographical data has to be resampled [4] and registered before fusing the data. The most common signal level fusion is the one coming from the same sensor with the same measuring technology. In this case there are several uses of the data:
-
- Data fusion from different fields at the same scale to cover larger measured areas. This is known as stitching or sub-aperture stitching, common in any commercial 3D scanner. Stitching is done by translating the sample under measurement in different positions in either, a two-axes XY stage or a five-axes scanner, with an overlapping area between fields to help post-processing during data registration.
- Fusion of topographical data acquired with different objective’s magnification to provide shape and texture on a single result [4].
- Data fusion within the same field of view and same magnification, but with different scanning parameters. This is the typical case where a sample is having high reflection and low reflection regions, requiring different light illumination levels to deal against the dynamic range of the imaging camera. Several strategies are adopted here, like doing two vertical scans at different light levels [5], using HDR cameras, or even coating the sample with fluorescence polymers to increase the scattered signal on high slope regions [6].
- Data fusion over time of the same field within the same scanning parameters to deal against instrument noise and external disturbances. Data is averaged providing lower noise, and higher repeatability.
In this paper we are dealing with signal level data fusion. The idea behind it is the fusion of topographical data coming from different sensors on the same instrument that can be operated simultaneously. The benefit of acquiring the data on the same instrument along the same scan is that most of the data registration is avoided, providing as a result higher linearity and accuracy. When fusing signal data from two sensors we have to take into account at least five different characteristics of the sensor itself before the registration:
1. Leveling: this is an easy step if the surface under inspection is relatively flat, but very difficult if step-like structures are present. Leveling has to be carried on the two topographies by extracting features and correlating them. On rough random surfaces precise leveling is almost impossible.
2. Calibration of the lateral scale: similar to leveling, if structures are present on the surface, they can be extracted and registered between them, but precise calibration of the optical magnification and field distortion is necessary before data fusion.
3. Data post-processing: outlier removal, missing points, filling non-measured regions, and smoothing are different post-processing steps carried differently for different measuring technologies. Data correlation, registration, and interpolation are again necessary.
4. Linear amplification coefficient: if data is coming from two different technologies, calibration of the linear amplification should be done with great care. This is typically done with a set of several traceable Step Height standards by measuring all them and calibrating the slope of the linear scan to minimize the accuracy error for all them [7]. This has to be taken also into account within the same instrument with different sensors: is stepping the scanner, while Coherence Scanning Interferometry or focus variation are moving the scanner at continuous speed. The scanner linear amplification coefficient could be different in those cases.
5. Stage linearity: even with precise linear amplification calibration, non-linearities of the scanner are superimposed to the topographical data. Different pixels at different measured heights will have different accuracy errors, which will confuse the data registration and thus providing lower accuracy on the fused topography than on the single ones.
The best instrument to cater to measurements on as many different kinds of surfaces as possible while avoiding the aforementioned problems, will be the one that has the capability to perform measurements with any of the technologies during the same scan. Nevertheless, there are some surfaces where none of the three aforementioned technologies yield ideal results. The combination of data from two of the three technologies could in principle provide better results. The most difficult technology to combine with any one of the others is CSI. The reason for this is due to the intrinsic design of an interferometer, where the reference mirror is always in focus. This leads to a bright confocal image in focus and a bright background all along the scan, decreasing dynamic range and bright field contrast of the surface texture. In contrast, confocal microscopy and focus variation have the optical sectioning property in common, with similar depth of focus characteristics. The main difference between them is that confocal deals better with smooth surfaces, while FV with very rough surfaces.
In this paper we show how to acquire simultaneously a confocal and a bright field images on the same vertical position. The scanner is driven on a step by step manner, providing two series of images, a confocal and a bright field, that are used to fuse data information from confocal and focus variation. By doing this, leveling is exactly the same for both sets, objective magnification and field distortion is the same, linear amplification coefficient is exactly the same, and the nonlinearities of the vertical scanner and superimposed on the two data sets exactly with the same pattern. This process avoids correlation, data registration and interpolation, providing as a result higher accuracy than any other data fusion technique.
3. Method
3.1 SIMULTANEOUS IMAGING OF CONFOCAL AND BRIGHT FIELD
There are several arrangements that provide a microscope the capability of making optically sectioned images. According to the ISO25178-607 [8] there are mainly three different technologies: laser scan, disc scan, and microdisplay scan confocal microscopes. A laser scan confocal microscope uses a laser as a light source illuminating a pinhole that is projected onto the surface under inspection. The light reflected or scattered from the surface is imaged back to a second pinhole, called confocal aperture, which is responsible to filter out the light that reflected outside the depth of focus of the objective. The beam is scanned in a raster scan manner to cover a desired field of view. In a disc scanning confocal microscope, a disc with a pattern of opaque and transparent regions, usually a large number of pinholes or slits, is imaged onto the surface. A light source illuminates the required area on the disc needed to fill the desired field of view. The light reflected from the surface is imaged back through the same pattern, providing the light rejection. The pattern is imaged onto a camera where a confocal image is recorded. In both confocal arrangements, the illumination and observation light path does not allow to record a bright field image. To solve this problem on commercial instruments (which require a bright field image for sample manipulation), both arrangements incorporate a second light source and a beam splitter before the pupil of the microscope’s objective that allows bright field illumination and observation through a dedicated camera. In contrast, a microdisplay scan confocal microscope, as shown in figure1, can use the same illumination and observation optical path to acquire a confocal and bright field image [9].
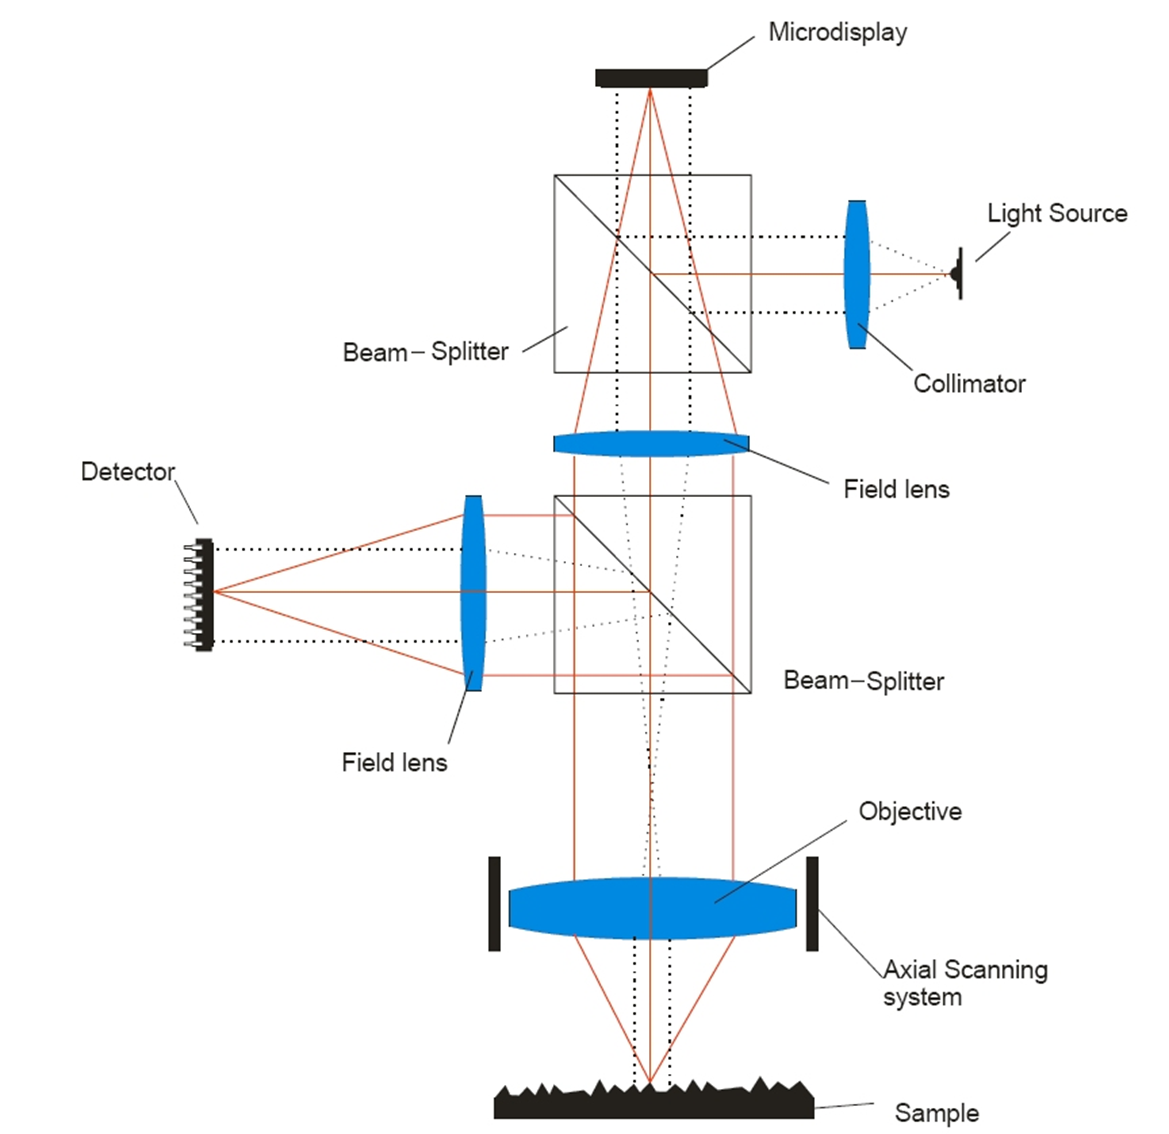
A light source is collimated and directed onto a microdisplay, which is located on the field diaphragm position of a microscope’s objective. The microdisplay is of reflective type, and it can be based on FLCoS (ferroelectric liquid crystal on silicon) or DMD (digital micromirror device). Each pixel of the microdisplay is imaged onto the surface, and by the use of a field lens, the surface and the microdisplay are simultaneously imaged onto a camera. To recover the same performance of a laser scan microscope, a single pixel of the microdisplay is switched on (behaving as reflective), while all the other are switched off. A single point of the surface is illuminated, and the corresponding single pixel of the camera is recording the signal. Optical sectioning light rejection is achieved by the fact of recording the signal of a single pixel of the camera, which is behaving as a confocal aperture pinhole and detector simultaneously. A raster scan of all the pixels of the microdisplay creates a confocal image in the same way a laser scanning system is doing. Parallel illumination and signal recording can be achieved by switching on a set of equally distributed pixels, slits or any other pattern that restricts the amount of illumination. Switching on all the pixels of the microdisplay and simply recording a single image of the camera easily recovers a bright field image.
The combination of confocal and focus variation is much easier to realize in the sense that simultaneous images can be acquired. In the present paper we use a 3D optical profiler called S neox, from Sensofar-Tech SL, which uses scanning microdisplay approach to scan the surface and acquire the confocal image. One of the benefits of using a microdisplay to scan the field diaphragm of the microscope, is that it can be used to simultaneously acquire a confocal and a bright field image at the same vertical scanning position. The aspect of grabbing both image series using the same vertical scan yields high accuracy and permits cross-correlation of data – were the two series of images to be drawn from two different vertical scans, repeatability and accuracy will be lower. We have analyzed three different ways to fuse the data from the two series of images: topographical data fusion, image-to-image data fusion, and pixel-to-pixel axial response fusion.
As mentioned before, focus variation technique is somehow similar to confocal microscopy in the sense that the images have optical sectioning. The main difference is that confocal have real optical sectioning for each pixel, while the sectioning ability of focus variation relies on the texture of the surface, the numerical aperture of the objective, the wavelength, the focus algorithm, and the algorithm to fill poor signal regions. For this study we have used three common focus algorithms [10]: laplacian, sum of modified laplacian (SML), and gradient gray level. Each different algorithm gives different results depending on the texture of the surface and the numerical aperture of the objective. We have used one of the three depending on the sample we were inspecting. A 3×3 maximum filter was applied on all focus variation images before proceeding with the fusion technique.
3.2 TOPOGRAPHICAL FUSION
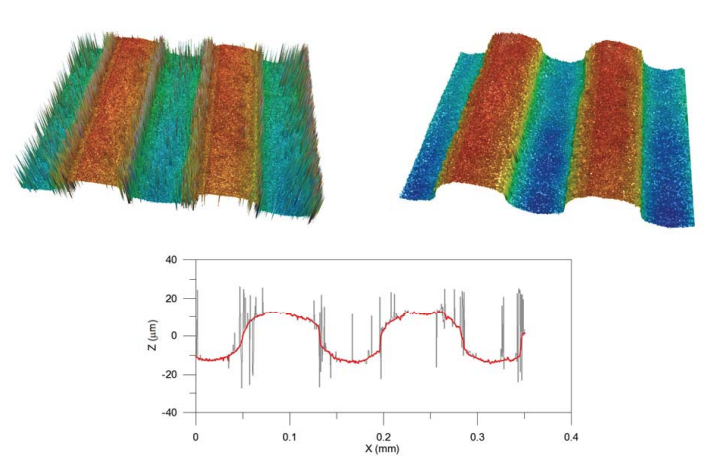
Fusion of the data coming from the two isolated topographies seems to be the most easy and straightforward approach. With this method, the two series of images result in two topographies. The most precise of the two will be the one coming from the confocal series of images, but it will also have a greater number of non-measured points when a safety threshold is used. If the signal to noise ratio is very low, the resulting measured point could be a spike or non-measured point. The focus variation topography is less precise, but due to its algorithmic nature, it will provide topographical data on high slope and rough regions, despite larger overall noise than for confocal. Topographical fusion is achieved by identifying the non-measured points on the confocal topography and creating a mask that is applied to the focus variation topography. This masked result is smoothed and copied to the confocal topography. Figure 2 shows the result of this method on a micromachined surface. The topographies (left/right) are the confocal and after topography fusion, respectively, while the profiles shown below are of the raw confocal (in light grey) and the fused data (red line). For better understanding of the loss in confocal mode on low signal regions, a zero threshold and no post-processing of the confocal topography is shown. The spikes shown in the figure belong to non-measured points when a safety threshold is used.
3.3 IMAGE FUSION
Image fusion is a plane-by-plane approach. Unlike the topographical method, this lower level approach fuses information by creating new averaged plane images from which the three dimensional result is computed. The main benefit of this method is the addition of information in all the stack of images in areas that are empty in one single technique. However, the fusion is smoothing other areas that are already well defined. Image fusion from confocal and focus variation provides higher signal than the HDR technique in similar situations. As explained in section 2, HDR technique is used to provide higher signals on slope regions while not saturating the camera on flat regions. Nevertheless, scattering and light absorption could make this technique not even usable.
The optical sectioning in confocal and focus variation is proportional to the wavelength and inversely proportional to the square root of the numerical aperture. The Z resolution value of the optical sectioning is totally reliable for confocal imaging and also valid for focus variation although this could slightly vary depending on the sample’s texture, objective used, and focus algorithm applied. The resulting confocal and FV images at each plane share a lot of similarities with a more depth discrimination in the confocal case.
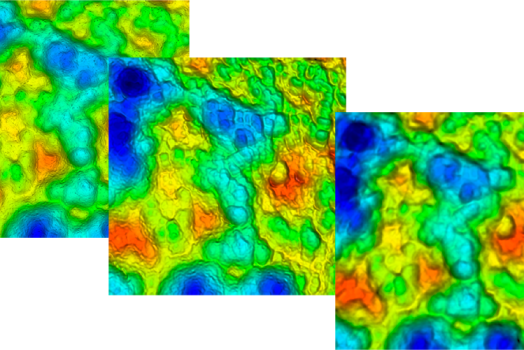
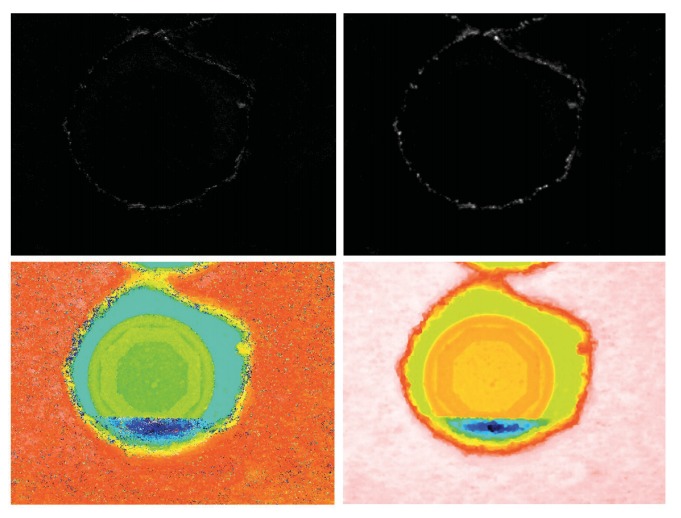
In this approach, the mean value of each image pair is computed, and then the FV image is offset to match the signal of the confocal image. By doing this, the confocal series retain the original signal, while the FV is dynamically adjusted. Figure 3 depicts how the image fusion is able to enhance the information in areas in which the confocal image is weak. This plane-by-plane approach results in a third, fused series of images, from which the three dimensional result is computed.
3.4 AXIAL RESPONSE PIXEL BY PIXEL FUSION
Axial response fusion is based on a pixel-by-pixel approach. Similarly to the topographical and the image fusion technique, this approach combines the information of confocal and focus variation getting better results than with a single technique. However, in this case the method is able to dynamically select for each pixel what is the best axial response: confocal, focus variation or a fused one. The axial response for each pixel is created by computing the intensity value of one pixel of each optical sectioning image. The resulting three-dimensional topography preserves all the accurate confocal information in addition to the focus variation information when the confocal signal is low. Furthermore, the noise is reduced in those pixels where both techniques have a weak peak by averaging both axial responses and generating a defined peak. Figure 4 shows two results of fusing the axial response signal. The picture on the left is showing a region of the surface where the confocal signal is very low, and focus variation very high. The picture on the right is showing a region of the surface where both signal have poor signal to noise ratio. The fused information improves the SNR in this case.

In order to fuse both axial responses at each pixel of the two series of images, the mean and maximum value of both axial responses are computed. The FV axial response is then adjusted to match the offset and maximum value to the confocal image. The algorithm chooses the best axial response according to a signal-to-noise ratio (SNR) criterion. An axial response is well defined when the ratio between the values of the images in focus and out of focus are clearly different. Thus, the algorithm determines the selected axial response taking into account that the confocal technique has better depth discrimination than the FV.
The axial response fusion is driven through a decision process for each pixel as shown in Figure 5. One threshold with a high value (A) and another threshold with medium value (B) are defined to compare to the SNR of the signal. Threshold A is set for those axial responses where the focus position is clearly defined (high SNR) while threshold B corresponds to axial responses with less definition (low SNR). On a first step, the SNR of the confocal axial response is evaluated to threshold A to preserve accurate areas. If this condition is not fulfilled, the focus variation is compared to threshold A to preserve areas where its signal is good. Remaining pixels have lower SNR for both techniques. If both signals are above threshold B then the fusion is providing the final axial response. Both techniques SNR axial responses are compared to threshold B with higher priority to the confocal case. On a final step, a non-measured point is assigned when the axial response in both cases have low SNR.

Figure 6 shows the same surface as in figure 2, comparing the confocal result (left) to the axial response fusion (right).

4. Results
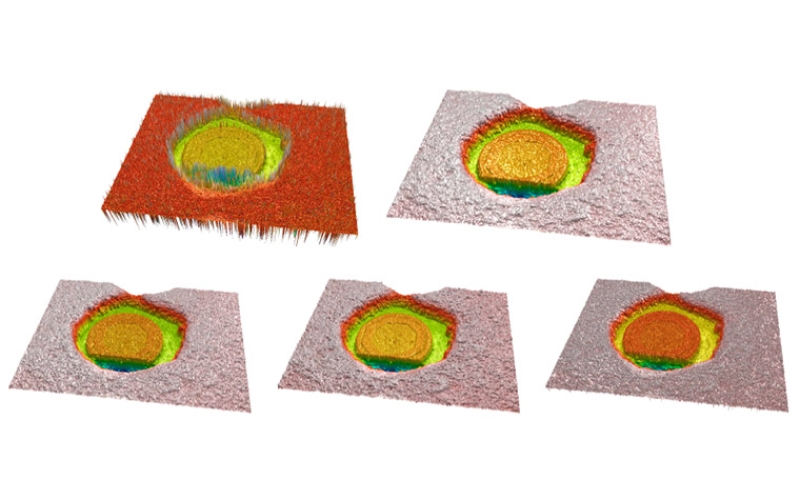
To test the performance of the three fusion methods, several samples with high, and very dark slopes were selected. All measures were taken with a Nikon 50X 0.8NA, and 150X 0,9NA objectives. The confocal raw topographies were taken with zero threshold, and no post post-processing, showing all the wrong pixels, especially on the poor signal regions. Figure 7 shows a laser drilled cooper surface. The laser drilling process is leaving a very dark region on the slopes that require a high dynamic range to recover some confocal signal, while saturating the flat region. The focus variation topography on such surface does not profile the real roughness of the cooper, neither the structure on the middle, providing instead smoothed areas. Figure 8 shows a cross profile along the highest slope region with the raw confocal and the image fusion technique.
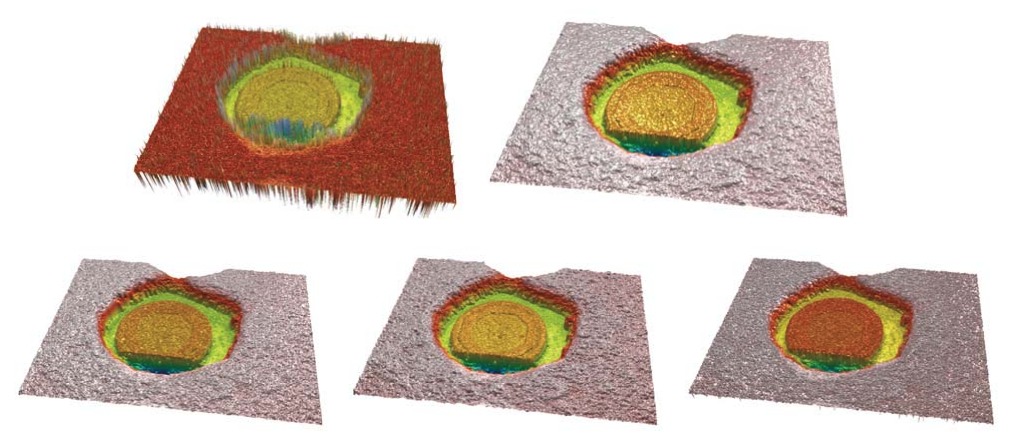
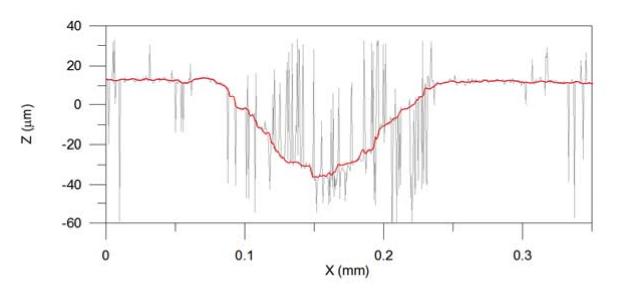
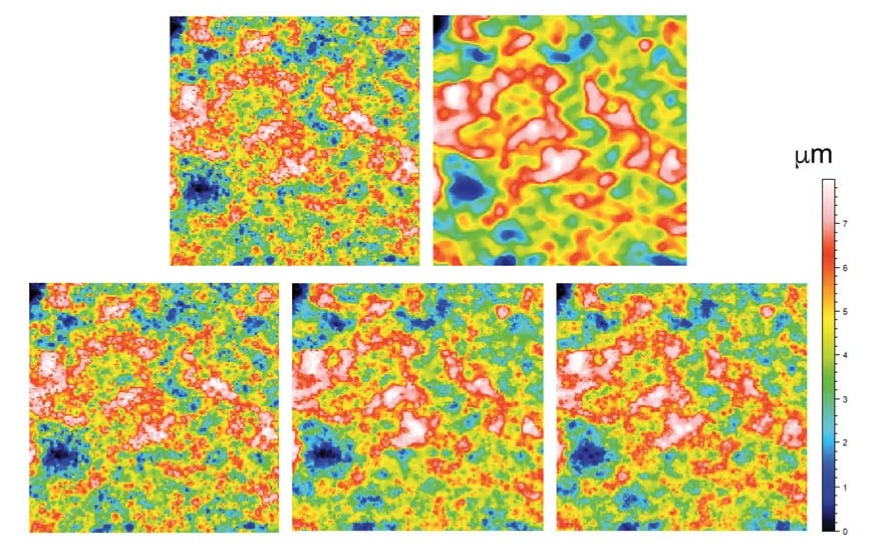
Figure 9 shows the result of zooming on the cooper region (lower right corner) of Figure 7. Confocal and focus variation topographies are shown on the top. It is noticeable the higher lateral resolution of the confocal result, and a lower the resolution of the focus variation due to the algorithm itself, that is somehow following the higher contrast part of the texture, and the smoothness of the result due to the focus algorithm, the max filter, and the smoothing of the result necessaries to carry out a reasonable measure. On the lower part of Figure 9, the three fusion algorithms are shown (topography fusion, image fusion and axial response fusion). Note how well the image fusion and the axial response fusion keep the higher resolution of the confocal result, while providing the necessary information on the slope regions of the Figure 7.
5. Conclusions
Three different methods are proposed to fuse data coming from two series of images from confocal and focus variation scans. Simultaneous scanning is realized by utilizing a microdisplay scanning confocal microscope, thus allowing high cross-correlation of height position between two series of images. Topographical fusion provides nice results, but does not adjust dynamically to the surface characteristics. Image fusion and axial response fusion dynamically adapt the focus variation signal, plane-by-plane or pixel-by-pixel respectively, to match the confocal signal. We have proved that both, image fusion and axial response fusion provide topographies with closer spatial frequencies to confocal, and measured data on low SNR regions. This novel technique of data combination provides better three-dimensional measurements for those surfaces with partially rough and partially smooth regions in combination with high slope.
References
[1] Leach R. Optical Measurement of Surface Topography. Springer Verlag ISBN 978-3-642-12012-1
[2] Lee I., Mahmood M. T., Choi T. Adaptive window selection for 3D shape recovery from image focus. Optics & Laser Technology 45 (2013).
[3] Wang J., Leach R., and Jian X. Review of the mathematical foundations of data fusion techniques in surface metrology. Surf. Topogr.: Metrol. Prop. 3 (2015).
[4] Ramasamy S.K., and Raja J. Performance evaluation of multi-scale data fusion methods for surface metrology domain. Journal of manufacturing systems 32 (2013) 514-522.
[5] Fay M.F., Colonna de Lega X., de Groot P. Measuring high-slope and super-smooth optics with high-dynamic range coherence scanning interferometry. Classical Optics (2014) OSA.
[6] Liu J., Liu C., Tan J., Yang B. and Wilson T. Super-aperture metrology: overcoming a fundamental limit in imaging smooth highly curved surfaces. Journal of Microscopy (2016) Mar;261(3):300-6
[7] Leach R. Is one step height enough?. Conference: Proc. ASPE, At Austin, TX (2015)
[8] ISO/CD 25178-600 (2013) Geometrical Product Specification (GPS) – Surface Texture: Areal – Part 600: Metrological Characteristics for Areal-Topography Measuring Methods, International Organization of Standardization, Geneva, Switzerland.
[9] Artigas R., Laguarta F., and Cadevall C. Dual-technology optical sensor head for 3D surface shape measurements on the micro and nano-scales. Spie Vol 5457, 166-174 (2004).
[10] Helmi, F.S., and Scherer S. Adaptive shape from focus with an error estimation in light microscopy. Image and signal processing and analysis (2001) 188-193.


