Confocal Fusion: Towards the universal optical 3D metrology technology
Confocal Fusion: Towards the universal optical 3D metrology technology publication
C. Bermúdez 1, A.Matilla 1, A.Aguerri 1
1 Sensofar-Tech, S.L. (Spain)
March 2017
Euspen, Conference: LAMDAMAP Project: Confocal Microscopy
Abstract
In recent times, optical measurement technologies for the three dimensional characterization of technical surfaces have been extensively used. Some of the most common are Coherence Scanning Interferometry (CSI), Imaging Confocal Microscopy (IC), and Focus Variation (FV). Each one has its benefits and its drawbacks. In this work we present the results of using a Microdisplay Scanning type of Confocal Microscope to acquire, on a simultaneous scan, confocal and focus variation information to reconstruct a three dimensional measurement, which performs exceptionally on several industrial samples where the aforementioned technologies are limited separately.
1. Introduction
In the past few decades, three-dimensional measurement of technical surfaces with optical methods has gained a large portion of the market. The most common imaging methods for microscopic measurements are Coherence Scanning Interferometry (CSI), Imaging Confocal Microscopy (ICM), and Focus Variation (FV) [1].
CSI is the most precise of all of them, being capable of achieving height resolution down to 1nm regardless of the magnification of the objective being used. Nevertheless, this approach is limited to relatively low numerical apertures (NA), making this technique to suffer from samples with high local slopes, although being optically smooth. Confocal microscopy, which can use high NA objectives, overcomes this problem. At the highest NA in air (typically 0.95), a height resolution of 1nm is achieved, and local slopes up to the optical limit of 72 degree are measureable. On optically rough surfaces, confocal microscopy achieves significantly better results in comparison to CSI, but at very high roughness, or even on rough and highly tilted surfaces, it suffers from poor signal. Focus variation provides in this case the best results, Laser Metrology and Machine Performance XII as it is based on the texture present in the bright field image. For this reason, optically smooth surfaces cannot be measured with FV. That is why this technique is typically suitable with low magnification, since most of the surface then appears as optically rough. Therefore in this paper we present the combination of the two latter techniques to be able to solve a broader range of applications.
2. Materials and methods
2.1 DATA ACQUISITION
According to the ISO25178-607, there are three type of confocal approaches: laser scan, disc scan and microdisplay scan. The latter is the one that allows recording both confocal and bright field images within the same optical illumination and observation paths [2]. Fig. 1 shows this particular arrangement.
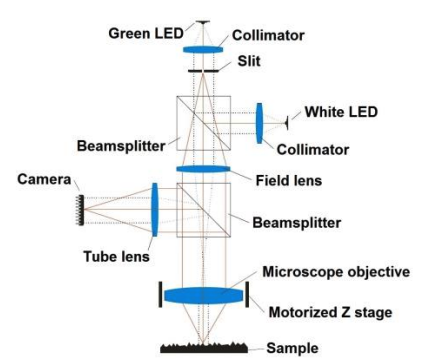
In this case we used a Sensofar S neox optical profiler, which allowed us to obtain both confocal and focus variation images simultaneously at the same vertical scanning position. As regards to the generation of the focus variation stack of images, we have used a 3×3 Laplacian kernel filter to detect the texture.
For relatively low objective NAs and with sample high slopes, no light of the epi-il·lumination is reflected back from this regions to the NA cone. We have overcome this problem by adding a second light source, consisting of a ring light around the microscope objective. This device provides diffuse illumination in a broad range of angles, therefore illuminating such high slopes. This light improves a lot the focus variation measurement and almost does not affect the confocal measurement, as this illumination behaves as a constant background but is not modulated in time.
2.2 DATA FUSION
We have tried three different data fusion approaches [3]. The first one, topographical fusion, uses the two topographies obtained from the confocal and FV scans. Topographical fusion is achieved by identifying the non-measured points on the confocal topography and creating a mask that is applied to the focus variation topography.
This masked result is smoothed and copied to the confocal topography. The second method is image fusion, and consists of blending at low level every confocal optical section with every focus variation plane. This technique provides higher signal level than an HDR technique in similar situations. Last method consists of fusing the two axial responses pixel by pixel. This approach is able to dynamically select for each pixel which is the best axial response: confocal, focus variation or a fused one. The axial response for each pixel is created by computing the intensity value of one pixel of each optical sectioning image. The resulting three-dimensional topography preserves all the accurate confocal information in addition to the focus variation information when the confocal signal is low. Furthermore, the noise is reduced in those pixels where both techniques have a weak peak by averaging both axial responses and generating a defined peak.
3. Results
In this paper we present the results of the third fusion method, axial response fusion, pixel by pixel. Samples with high and very dark slopes were selected. All measurements were taken with Nikon 20X 0.45NA and 50X 0.8NA objectives.
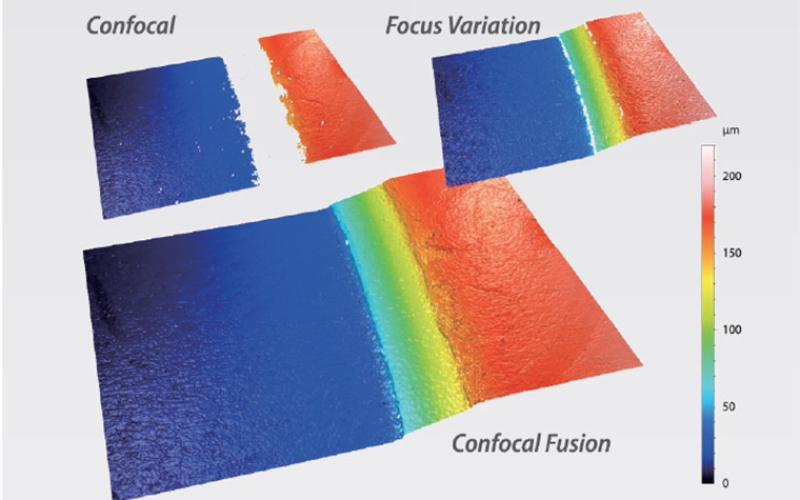
Fig.2 shows a coin surface imaged with the 20X 0.45. Confocal measurement (a) does not recover enough signal from high slopes, appearing non-measured points, depicted in black color. On the other side, focus variation retrieves more data from the slopes (b), but does not profile the real roughness of the smooth surfaces. Confocal fusion result (c), which is using the axial response, pixel by pixel fusion, keeps the good lateral resolution of the confocal measurement whereas fills all the non-measured points with real points from the focus variation measurement. Similar results are presented in Figure 3, which shows a laser-drilled copper surface imaged with a 50X 0.8NA objective.
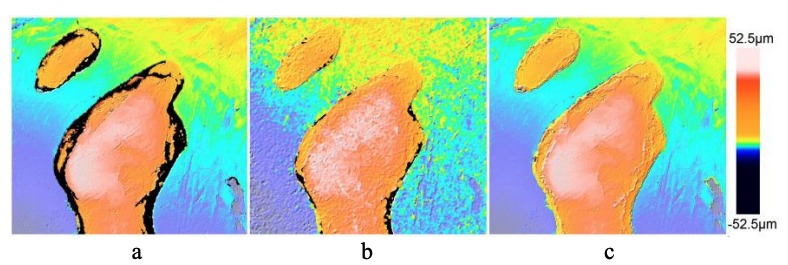

From the topographies above, the amount of measured points is presented in the following table, showing a clear improvement in both measurements.

4. Conclusions
In this paper, a new technique to fuse data incoming from a single confocal and focus variation scan is presented. Simultaneous scanning is realized by utilizing a microdisplay scanning confocal microscope, thus allowing high crosscorrelation of height position between two series of images. Data fusion is performed for every pixel by blending the axial responses from each technique, thus providing better three-dimensional measurements for those surfaces with partially rough and partially smooth regions in combination with high slopes.
References
[1] Leach, R., Optical Measurement of Surface Topography. Springer Verlag ISBN 978-3-642-12012-1 (2011)
[2] Artigas R., Laguarta F., and Cadevall C, Dual-technology optical sensor head for 3D surface shape measurements on the micro and nano-scales, SPIE Vol 5457, 166-174 (2004).
[3] Matilla, A., Mariné, J., Pérez, J., Cadevall, C, Artigas, R., Three-dimensional measurements with a novel technique combination of confocal and focus variation with a simultaneous scan, Proc. SPIE 9890, Optical Micro- and Nanometrology VI, 98900B; doi:10.1117/12.2227054 (2016)


